As (primarily) a landscape photographer, split neutral density filters are my bread and butter. I have 5 in all plus a solid ND and a polarizer. Split NDs are virtually useless in screw-in ring form, so I opt for the Singh-Ray rectangular filters with Cokin P series holders.
I've gone through several different filter cases from generic to name brand to custom to different custom, etc. There were some specific points I needed in a filter case that none of these fulfilled entirely. I wanted it to be small enough to fit in a camera bag and in a photo vest pocket, I wanted it to be able to attach to my belt or belt loop, I wanted it to be entirely enclosed when shut, I wanted no velcro closure (too loud) and I wanted it to adequately protect my filters without overkill.
Now I'm sure it's no secret among photographers that a CD wallet is a great option for this (if it is news to you - hooray!). The materials used to protect CDs are generally on par with materials used to protect photo equipment so there's no worry there. The sleeves are in a convenient binder-esque arrangement for easy browsing. It's small in width and length and relatively thin. The only problem I kept running into is I couldn't find a blasted CD case that would lay flat when opened. They all had this wrap-around design on the binding that would cause it to shut on itself like a new paperback novel.
Well this post is about a great case I found for this application as well as some of my modifications that make it the ultimate filter case.  First off, the brand of case is Case Logic and it's a 24 CD/DVD CD Wallet. It's great because it lays completely flat when opened - no spring return - and it's covered in this somewhat rubbery outer that has stood up excellently to the elements for me. It features a full zipper that is smooth and has a rubber-tipped zipper pull. It is the smallest CD wallet I have found that will still fit all my filters and its rounded corners and edges make for easy storage. I like it so much, I got two in case they discontinue it. I bought mine at Best Buy - not sure if they still sell them or not.
 Now onto the mods to make it even better. I wanted to be able to attach it to my hip belt loop, so I needed to add a carabiner in the upper left corner. I did this by taking some strong string (I used a sunglasses cord I bought at REI), threading it behind the sleeves and wrapping them around the binding pegs (see picture). I then tied it at the top with a slight loop hanging over the edge at the end of the zipper. I recommend melting the ends of the cord with a lighter to avoid fraying. This made it so a small loop of the cord would hang out of the wallet in the upper left corner when the zipper was completely shut. I then attached a small carabiner to this loop and presto, you got yourself a wicked side filter wallet.


To make it even better, I put labels on each sleeve indicating the filter. I did one horizontally on the opposing sleeve for viewing horizontally and a smaller one vertically on the filter's sleeve. The vertical label makes more sense when using the wallet when it's hanging from your side. I then put little squares of thin cardboard on the opposite side of each filter sleeve. This keeps the sleeve rigid when the filter is removed making it much easier to slide it back in later. 
I found this setup to work great for me. I just attach it to my right hip belt loop when I get my camera out and start shooting. I have every filter right at my fingertips in a completely sealed wallet (not water PROOF of course, but water resistant nonetheless). I can remove a filter and let the wallet drop to my side with no worries. It has stood up perfectly to many harsh conditions (especially sand and sea spray). I've never had a filter break in this wallet, it's easy to store and transport and it's cheap!
Thursday, August 28, 2008
Custom Filter Case
Monday, August 25, 2008
Bodie Ghost Town

I took a little day trip to Bodie State Park with my brother and his fiance to get some portraits about a week ago. I needed to blog about it because this place is insane with awesomeness. Seriously, it's out of control. There is no other place like it on the planet. It's a ghost town. But not like one of those Knott's Berry Farm going panning for fake gold after eating your funnel cake type of ghost towns - this place is legit. It's tucked away in these gorgeous rolling hills right near the just as insanely gorgeous Mono Lake and the Eastern Sierra Nevada Mountains. It's not restored, it doesn't have any novelty gift shops, there are zero modern structures (except the bathrooms) and no paved roads. It's in a state of "arrested decay." Think "There Will be Blood" frozen in time. There's a crazy-looking church, houses, a mill, a saloon - utter craziness. Check out Bodie.com for more information.
So anyway. We went there to get some engagement shots for my bro's wedding coming up in November. Now the thing about my brother and his fiance, they're olde tyme (that's "old time-ee"). In fact, as my brother has so accurately put it, Carver's are built to be olde tyme. Now when I say olde tyme, I don't mean we won't use cell phones or we think camera's steal your soul. We just appreciate the music and the culture of the late 19th century to early 20th century. And let's just say I look smashing in newsie's hat. Hell, my dad can play the banjo like nobody's business! So basically, this was the perfect backdrop for this couple.
I think the pictures turned out pretty great and my bro and his fiance were stoked with them (which is the most important part). Plus, I got an unexpected benefit from this trip. We drove through Bishop (Galen Rowell's stomping ground) and right past Mono Lake on the way to Bodie. I'd never been in this area before. I'd been to Lone Pine to the south and I've backpacked through the Eastern Sierras, but nothing beyond that. I am so glad I drove through Bishop and around Mono Lake that day. I was having eyegasms left and right. I couldn't get over how beautiful it was up there. The scenery is unbelievable. It really rekindled my fire to take a photo trip. I can't wait to go back to Bishop for a few days to shoot Mono Lake, Yosemite and Bodie. Just goes to show how beneficial scouting can be!
Enjoy the pics!


Tuesday, August 12, 2008
Take a Moment to Enjoy the Sunset

I've been working hard indoors all day. Been working on some projects, administrative duties, you know, all that boring desk job stuff we as photographers became photographers to avoid doing.
I glimpsed the sunset out my window and decided to head out front to enjoy it for a little break. It's a good idea to focus your eyes on something miles away after focusing it on a computer screen a few feet away all day.
I've seen a lot of sunsets in my day, but this one was stunning. I almost wished I was out taking pictures, but then I relaxed and decided to just enjoy it. I stood in the middle of my street staring up at the delicate curves and soft wisps of orange and pink while the faint music of a violin struggled to make its way to my ears. A neighbor must have been practicing. I imagine I looked a little weird standing barefoot in my street gazing up at the sky like it was going to disappear. I say this based chiefly on the double take of the girl across the street probably wondering what the hell was wrong with me.
I enjoyed this sensory massage for a little bit, snapped some pics with my iPhone and headed inside to get back to the grind. This little experience reminded me how important it is to pause and enjoy the sunset every once in awhile. Luckily for my line of work, that often times goes hand in hand with the job!
Thursday, August 7, 2008
Photographer's Tools: Tide Charts
 In this first installment of my "Photographer's Tools" series (wherein I will discuss tools and tips to help photographers make better pictures), I will cover an often overlooked tool for photographers: Tide Charts. Whether you live by the ocean like me or you are planning on taking a trip to the coast, you better make room in your camera bag for tide charts (figuratively of course, who really needs to "make room" for a tide chart? That's just ridiculous).
 In my own experience, and I think many photographers would agree, the success of a good image lies in the pre-shoot preparation. Whether you're shooting a scenic or a portrait, it's all about how prepared you are when the time comes to click the shutter. Tide charts can give a little window to the future that will help make your coastal shots that much better.
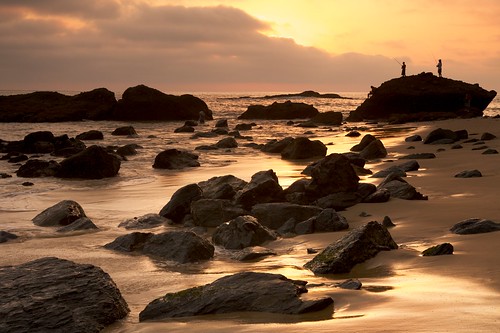
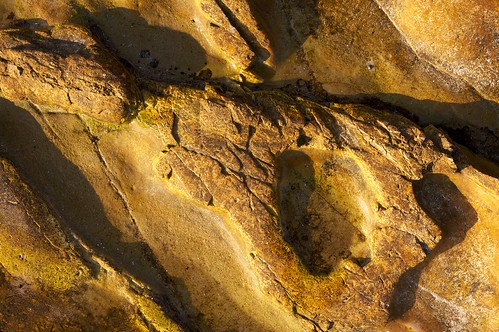
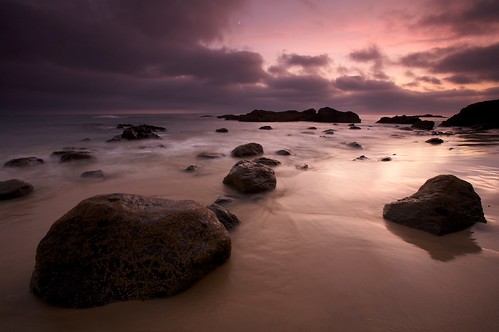
 I personally love to include rocks and tide pools in my coastal pictures. Rock formations along the beach and boulders strewn across the white sand seem to make a regular beach picture so much more unique. They add texture, weight and shadows to otherwise mediocre photos. The mussels and sea life found in tide pools at low tide create even more interesting additions to a landscape and are amazing photo subjects all by themselves. With tide charts, you can find out to the minute when the tide will be at its lowest. You can plan ahead knowing that these rocks at this location will be exposed at this time of day. And by scouting out the location ahead of time, you can even get a mental image picture of your shot before you set foot on the beach.
 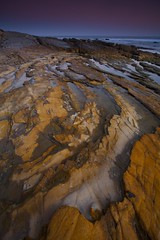 For example, I know the beach of Crystal Cove State Park in California like the back of my hand. When I looked at the tide charts the other day and saw that low tide would be at 6:57pm, I knew this park would have some interesting rocks and tide pools to play with for some sunset shots. I didn't waste any time looking around other beaches or deciding where to go. Since I knew the tide would be low, I knew Crystal Cove was the place to be.
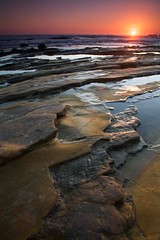
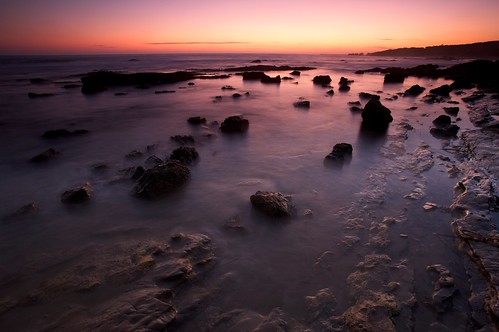
This brings me to my next point: I only went out and took pictures on this day BECAUSE the tide was low at sunset. Normally I don't bring my camera out for any landscape work if there are no clouds in the sky. I am bored easily by cloudless skies and this day was clear as a summer afternoon (seeing as how it WAS a summer afternoon). But I knew low tide at sunset would be a pretty good bet, even with no clouds, so I packed my gear and headed out. Had I not checked the charts and had I not known what gems low tide could bring me, I would have stayed in and done other work. I'm sure glad I went, because I had a lot of fun and was really pleased with the results.
With amazing devices like the iPhone, tide charts can be at your finger tips at any moment in any place. I don't have to print out a tide chart every month and remember to slip it in my bag, I have all the information at my fingertips. A great site that I have bookmarked on my iPhone is www.tidesonline.com. Its simple interface and logical layout make for a great online tide chart.
 These charts are not only valuable for the low tides. If you know of a place, for instance, that would be perfect at high tide at sunrise, use the chart to find a date when the high tide is right when you need it. Or if you know that the waves are biggest at high tide at this particular beach, find a date when the high tide is at the right time and get out and shoot them.
If you do go out at low tide and are navigating across tide pools, please be responsible. Tread lightly and watch where you put your foot. That slimy rock might actually be a sea slug and those mussels latched onto the rocks are not, in fact, indestructible and they are living animals. And be smart. If you know it's mid-tide but the tide is coming IN, don't put your camera bag where the tide will catch up to it and don't get trapped on that rock outcropping as the tide moves in around you (almost happened to me, folks).
Tide charts are your friend. They are incredibly accurate and give some hint at what the future holds along your favorite beach. Use them.